-
Get In Touch
+1 614-706-5172
-
Send us a Mail
info@datapluzz.com
-
Sunday - Closed
Mon - Sat(08.00 - 19.00)
Best Power BI Solution Agency
Get In Touch
Send us a Mail
Sunday - Closed
Best Power BI Solution Agency

Azure Active Directory groups are used to manage users that all need the same access and permissions to create resources, such as potentially restricted apps and services. Groups can be created using the Azure Active Directory Portal.
Note, only the following roles can manage groups: Groups Administrator, User Administrator, Privileged Role Administrator, or Global Administrator. Once a group is created, members that require the same permissions can be added to the group. It is always best practice to add members to roles that grant exactly the permissions they need to do their jobs, and no more. To prevent security issues, users should not be given additional permissions if not necessary. Once members are added to the group, permissions/roles can be assigned to the group.
Below is a brief explanation of the recommended AD groups:
Tenant admin -> This AD group should contain a very limited number of people, as this role will give access to tenant settings.
Business admin -> This AD group is designed for team/dept leaders. These people will be able to create shared workspaces and modify gateway connections. These are the people that will create the workspaces for users with less permissions.
Workspace admin -> This AD group is intended for owners of a workspace. They will request workspace creation from the business admin, and then be able to add other users to the workspace, change/manage permissions, etc. Can also act as developer.
Developer -> The developer AD group is intended for users who will be creating PBI reports, such as analysts. These users only need permission to basically access the data and create reports.
Viewer -> the viewer AD group is intended for users in a workspace to view and interact with items in a workspace, as well as read the data stored in workspaces, but not able to create reports/use the data. Essentially used for sharing reports.
App viewer -> a viewer will see all reports in a workspace, but sometimes for example out of 10 reports in a workspace you only want to give viewers access to 3 of them, you can achieve this by creating a workspace app (sub-folder of workspace), and then in this app you only give access to the app viewer group.
Naming Conventions: It is recommended to follow a standardized naming convention to keep AD groups organized and easy to understand. Examples: PBI_Finance_Dev, PBI_Finance_Prod.
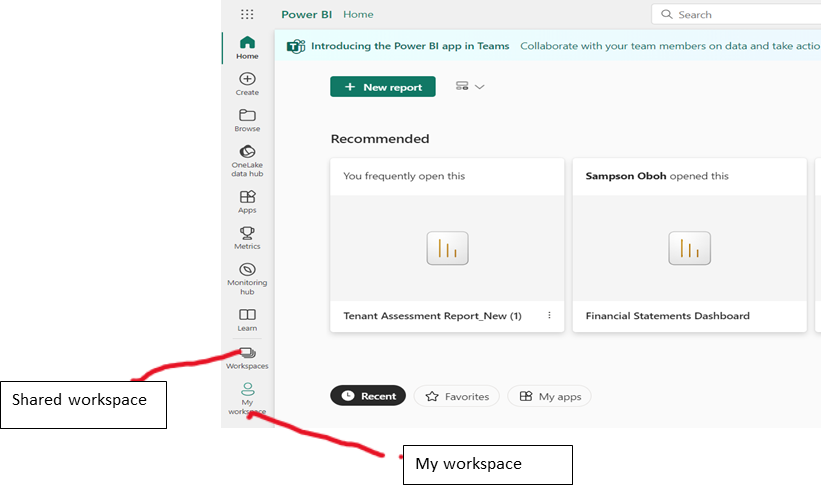
Workspaces are places to collaborate with colleagues to create collections of dashboards, reports, datasets and paginated report. There are 2 types of workspaces;
My Workspaces: Contents can be assessed by account owner only. Admins do not have access to this workspace.
Shared Workspaces: Content shared with others by giving them separate roles(Admin, member, contributor, viewer). Power BI Admins can access this workspace.
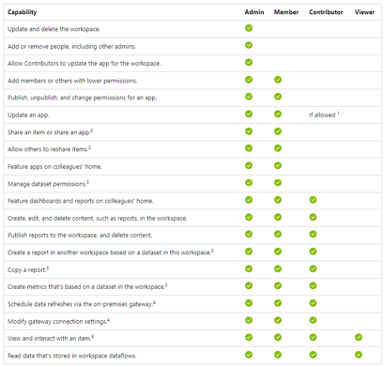
Users who are assigned the admin role in a workspace (or the creator of the workspace) can give others access to it by adding them to the different roles. The following roles can be assigned to users or AD groups within workspaces.
Principal of least privilege: The principle of least privilege (POLP) is a concept in computer security that limits users' access rights to only what are strictly required to do their jobs. Users are granted permission to read, write or execute only the files or resources necessary to do their jobs.
Row Level Security (RLS) can be used to restrict data access for given users. For users with viewer permissions, visibility can be restricted to defined rows in the data model by assigning roles to the users. For example, you can ensure that workers access only those data rows that are pertinent to their department. RLS should be used anytime there is sensitive data being shared.
Within Power BI desktop, from the modeling tab, select manage roles.

From the manage roles window, select create.
Under roles, provide a name for the role.
Under tables, select the table which you want to apply a DAX rule.
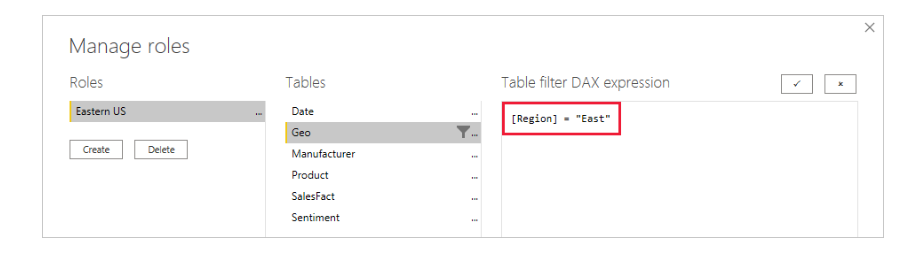
In the Table filter DAX expression box, enter the DAX expressions. This expression returns a value of true or false. For example: [Entity ID]=”Value”.
After you’ve created the DAX expression, select the checkmark to validate the expression. Then click save.
You can also enable dynamic security by using the USERPRINCIPALNAME() DAX function to return the users e-mail address. For Example: [Email]=userprincipalname(). This will prevent any data that is not related to that user’s email from being shown.
It is recommended to test and validate roles within Power BI Desktop to ensure configurations are correct, as shown in the image below.

In general, it's often more efficient to enforce RLS filters on dimension-type tables, and not fact-type tables, and rely on well-designed relationships to ensure RLS filters propagate to other model tables. RLS filters only propagate through active relationships. So, avoid using the LOOKUPVALUE DAX function when model relationships could achieve the same result. It is recommended to use RLS anytime sensitive data is being shared, and always validate the roles prior to sharing.
Access management and row level security are two great ways to protect your organization’s data. It is better to be proactive when dealing with sensitive data, rather than being reactive.


Get In Touch
Send Us A Message